Email service webhooks and WordPress

In the realm of digital communication, email service providers (ESPs) are the unsung heroes, silently powering our daily exchange of emails. The less visible, but significantly useful aspect of some of these services is their use of webhooks, which give users real-time insight into how recipients are interacting with their outbound emails, and enables automated responses to these interactions. In this article, we aim to shed light on this key feature, explaining what webhooks are, why they’re useful for WordPress site operators, and how different ESPs use them.
Understanding webhooks
A webhook is a way for an application to provide real-time information to other applications. It’s essentially a notification system that triggers when specific events occur, sending a HTTP POST request to a pre-defined URL. In the context of ESPs, these events can be various stages in the email lifecycle, such as when an email is opened, clicked, bounced, or marked as spam.
For example, when a user clicks a link in your email, the ESP detects this action, and if you’ve set up a webhook for click events, it sends a message to your specified URL. This message, typically in JSON or XML format, contains details about the event.
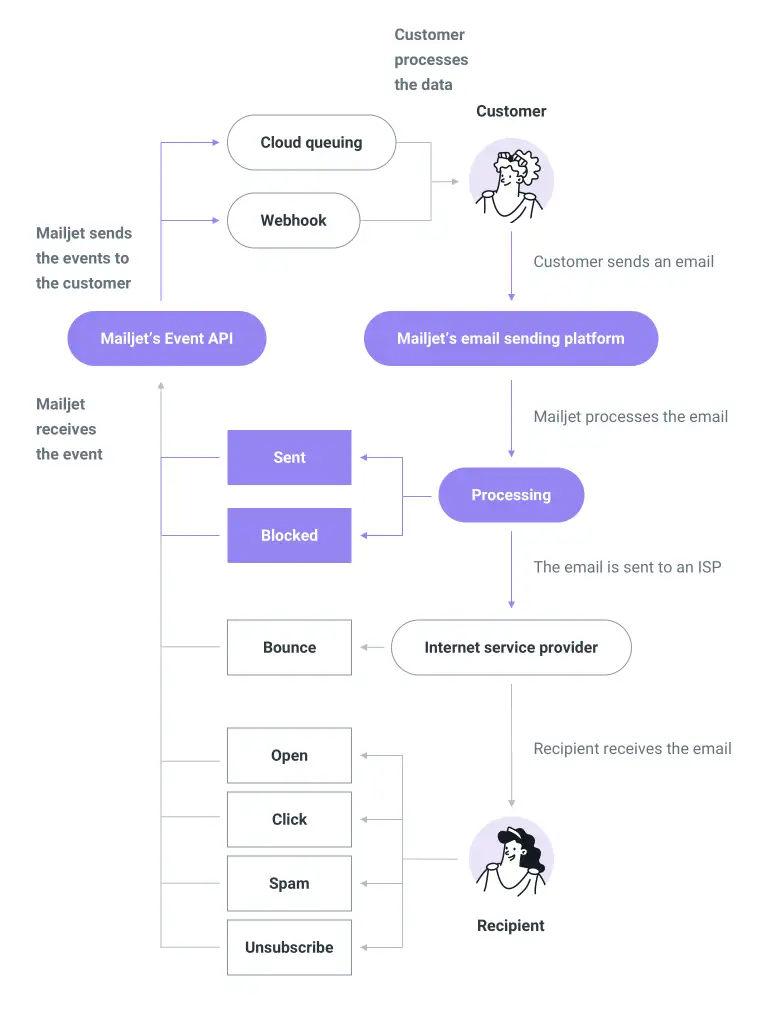
Here’s how ![]() Mailjet illustrates the process that leads up to a webhook calling your WordPress site, with “Customer” being you, the email sender, and “Recipient” being the intended email recipient:
Mailjet illustrates the process that leads up to a webhook calling your WordPress site, with “Customer” being you, the email sender, and “Recipient” being the intended email recipient:

 Mailjet
Understanding webhook URLs
A webhook URL is an HTTP address that your server will call to send data each time a specific event occurs. It’s essentially a designated endpoint on your server where the ESP will send real-time updates.
On a WordPress site, a webhook address will usually look something like https://yourwebsite.com/wp-json/yourplugin/v1/webhook/, where yourwebsite.com is your domain name, yourplugin is the namespace for your custom endpoint or plugin, and webhook is the specific route that handles the webhook data.
There are generally two methods of setting up a webhook URL with your ESP:
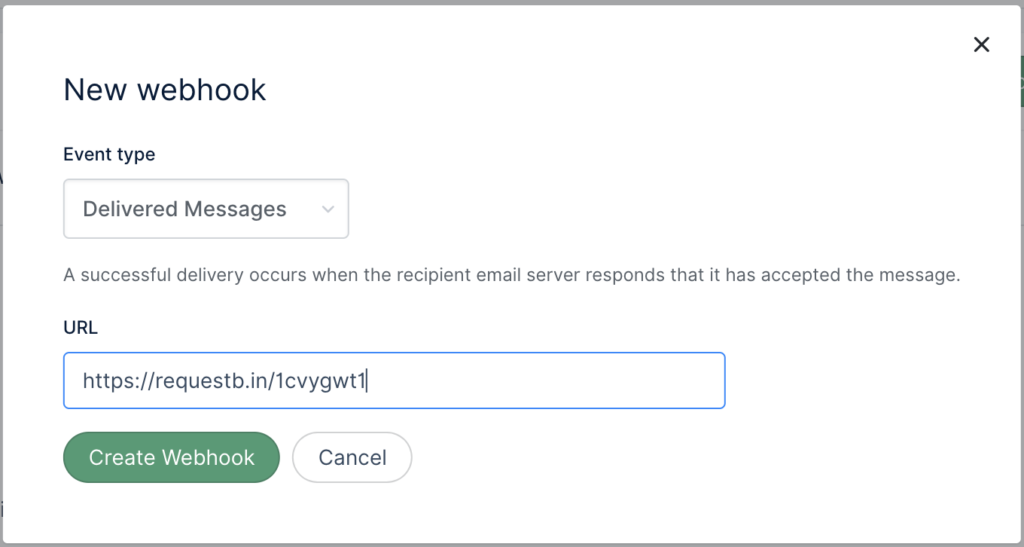
- Using the ESP’s API: Most ESPs provide an API method that allows you to programmatically set up a new webhook. You’ll typically need to specify the URL of your webhook endpoint and the types of events that you want the webhook to trigger on.
- Using the ESP’s dashboard: Alternatively, many ESPs allow you to set up webhooks directly from their user interface. This is typically found in the settings or account preferences section.
When your server receives a webhook call, it should return an HTTP 200 OK response to indicate that it has successfully received and processed the data. If your server returns any other HTTP status code, the ESP will typically interpret this as an error and may attempt to resend the webhook call at a later time. The specific retry strategy will vary by ESP, but it’s common for retries to occur at increasing intervals over a period of 24 hours.
Some ESPs also provide a feature to set up a backup webhook URL. This URL will be used in the event that the primary URL fails to respond or returns an error. This can be a useful way to ensure that you don’t miss any webhook events due to temporary issues with your primary endpoint.
How is a webhook different from an API?
APIs are like asking a question. Your website asks another system for information, and that system gives an answer back. The asking and answering happens each time a specific action is taken on your website.
Webhooks, on the other hand, are like getting a text message. Instead of your website having to ask every time, the other system will automatically send a message to your website when something new happens – in our case, a notable event in sending out your email.
So, APIs are for when your website needs to ask for information, and webhooks are for when the other system has new information to share automatically.
The utility of webhooks for WordPress site operators
Webhooks are useful for WordPress site operators in a number of ways. For example, they enable you to:
- Monitor when something goes wrong with an email you tried to send. These webhook calls fall into a category of “Delivery events”. This data can be used to clean up your mailing list and avoid getting caught up in spam blacklists.
- Monitor user interactions with your emails, providing valuable insight into user behavior. These webhook calls fall into a category of “Engagement events”.This data can be used to refine your email marketing strategies, customizing your content to better suit your audience’s preferences.
Moreover, webhooks offer a distinct advantage by calling back to the WordPress site itself. This callback mechanism facilitates the gathering of information directly within the WordPress site. This direct integration not only streamlines data collection but also enables the analysis and execution of actions within the WordPress site itself. This process creates a seamless, unified ecosystem for data management and action implementation.
In addition to these benefits, webhooks allow you to automate many processes. For instance, if a user unsubscribes from your emails, a webhook can notify your site, where you can set up a system to automatically update your mailing list in your database.
From a troubleshooting viewpoint, webhooks can help you identify issues with your email systems. For example, a high number of bounce events might signal a problem with your email delivery system that needs to be addressed promptly.
Webhooks offered by email service providers
Email Service Providers (ESPs) typically offer a range of webhooks that can be broadly categorized into two types: Delivery events and Engagement events.
Delivery events
Delivery events pertain to the process of sending an email to the recipient’s server. These may include:
- Send: The email has been successfully sent from the ESP.
- Processed: The ESP has received the request to send the email and is preparing to send it.
- Deferred: The email has been temporarily delayed due to an issue with the recipient’s email server. The ESP will continue to try to send the email.
- Dropped: The ESP has decided not to send the email, usually because the email address has previously bounced or marked emails as spam.
- Delivery: The email has been successfully delivered to the recipient’s server.
- Bounce (Hard): The email could not be delivered to the recipient’s email address, typically because the address doesn’t exist.
- Bounce (Soft): The email could not be temporarily delivered, often due to a full inbox or a temporary server issue.
- Bounce (Undeliverable): The email was undeliverable for reasons other than hard or soft bounces.
- Rendering Failure: The email wasn’t sent because of a template rendering issue.
- Reject (Virus): The email was accepted by the ESP, but was determined to contain a virus and not sent.
- Invalid Email: The email address provided was syntactically incorrect.
Engagement events
Engagement events relate to the recipient’s interaction with the email after it’s delivered. These can include:
- Opened: The recipient opened the email.
- Clicked: The recipient clicked on a link in the email.
- Spam Report: The recipient marked the email as spam.
- Unsubscribe: The recipient unsubscribed from future emails.
- Group Unsubscribe: The recipient unsubscribed from a specific group of emails.
- Group Resubscribe: The recipient resubscribed to a group of emails they had previously unsubscribed from.
- Blocked: The email was blocked by the recipient’s email server, often due to the recipient marking previous emails as spam.
Each ESP may offer a unique set of these webhooks depending on their features and the level of granularity in their reporting. Understanding these webhooks and their specificities is vital for leveraging their full potential.
Comparison table: webhooks events across different ESPs
To illustrate the diversity of webhooks offered by various ESPs, we’ve compared a few popular providers: Twilio SendGrid, Mailgun, Postmark, Amazon SES, Netcore, and Mailjet. The following table summarizes the events that each of these ESPs supports:
| Event Type | Twilio SendGrid | Mailgun | Postmark | Amazon SES | Netcore | Mailjet |
|---|---|---|---|---|---|---|
| Sent | – | – | – | ✔️ | ✔️ | ✔️ |
| Processed | ✔️ | – | – | – | – | – |
| Dropped | ✔️ | – | – | – | ✔️ | – |
| Delivered | ✔️ | ✔️ | ✔️ | ✔️ | – | – |
| Deferred | ✔️ | – | – | ✔️ | – | – |
| Bounce (Hard) | ✔️ | ✔️ | ✔️ | ✔️ | ✔️ | ✔️ |
| Bounce (Soft) | – | ✔️ | ✔️ | – | – | – |
| Bounce (Undeliverable) | – | – | ✔️ | – | – | – |
| Open | ✔️ | ✔️ | ✔️ | ✔️ | ✔️ | ✔️ |
| Click | ✔️ | ✔️ | ✔️ | ✔️ | ✔️ | ✔️ |
| Spam Report | ✔️ | ✔️ | ✔️ | ✔️ | ✔️ | ✔️ |
| Unsubscribe | ✔️ | ✔️ | ✔️ | ✔️ | ✔️ | ✔️ |
| Group Unsubscribe | ✔️ | – | – | – | – | – |
| Group Resubscribe | ✔️ | – | – | – | – | – |
| Rendering Failure | – | – | – | ✔️ | – | – |
| Reject (Virus) | – | – | – | ✔️ | – | – |
| Invalid Email | – | – | – | – | ✔️ | – |
| Blocked | – | – | – | – | – | ✔️ |
Connecting to webhooks
Connecting to webhooks involves a two-step process:
- Setting up a webhook endpoint: This is a URL on your server that will receive the HTTP POST requests from the ESP. This endpoint should be able to handle incoming POST requests and parse the JSON or XML data that it receives.
- Registering the webhook with the ESP: This involves logging into your ESP’s dashboard and providing the URL of your webhook endpoint. You will also specify which events you want the webhook to trigger on.
Note that the specifics may vary by ESP. Each ESP’s documentation should provide detailed instructions on how to set up and register webhooks.
Setting up a webhook endpoint in WordPress using custom code
Creating a webhook endpoint within WordPress involves creating a custom endpoint where the webhook data will be received.
1. Add the following code to your site (Reminder: ![]() Best ways to add custom code to WordPress). Let’s take the
Best ways to add custom code to WordPress). Let’s take the ![]() SendGrid “bounce” webhook event as an example. Its payload is a json structure that looks like this:
SendGrid “bounce” webhook event as an example. Its payload is a json structure that looks like this:
[
   {
      "email":"[email protected]",
      "timestamp":1513299569,
      "smtp-id":"<14c5d75ce93.dfd.64b469@ismtpd-555>",
      "bounce_classification":"invalid",
      "event":"bounce",
      "category":"cat facts",
      "sg_event_id":"6g4ZI7SA-xmRDv57GoPIPw==",
      "sg_message_id":"14c5d75ce93.dfd.64b469.filter0001.16648.5515E0B88.0",
      "reason":"500 unknown recipient",
      "status":"5.0.0",
      "type":"bounce"
   }
]
To capture this with a WordPress REST endpoint, set up the following code to capture the destination email address to which this event refers ([email protected]) and the event (bounce):
add_action( 'rest_api_init', function () {
  register_rest_route( 'myplugin/v1', '/webhook/sendgrid/', array(
    'methods' => 'POST',
    'callback' => 'my_sendgrid_webhook_handler',
  ) );
} );

function my_sendgrid_webhook_handler( WP_REST_Request $request ) {
  // Extract the request data
  $data = $request->get_json_params();

  // Check if the event is a bounce
  if ( isset( $data[0]['event'] ) && $data[0]['event'] === 'bounce' ) {
    // Extract the email and bounce reason
    $email = $data[0]['email'];
    $reason = $data[0]['reason'];

    // Do something with the data (e.g., update user data in the database, send an email, etc.)
    // ...
  }

  // Return a response
  return new WP_REST_Response( 'Webhook received!', 200 );
}
In the code above, myplugin/v1/webhook/sendgrid is the endpoint where the webhook data will be received. When a POST request is made to this endpoint, the my_webhook_handler function is triggered, which extracts the JSON data from the request and returns a response.
2. Register the webhook URL with your ESP: The URL for your new webhook endpoint will be something like https://yourwebsite.com/wp-json/myplugin/v1/webhook/sendgrid. You’ll need to provide this URL to your ESP when setting up the webhook.
Remember to replace 'myplugin/v1', '/webhook/sendgrid', and 'my_sendgrid_webhook_handler' with your desired namespace, route, and callback function name. The callback function (my_sendgrid_webhook_handler in the example) is where you will process the webhook data according to your needs.
Please note that this is a very basic example. For a real implementation, you’ll need to handle data validation, error handling, and potentially rate limiting. It’s also strongly recommended to log all incoming webhook data for debugging purposes.
For a more robust solution, you might consider using a dedicated plugin for handling webhooks, such as WP Webhooks or HookPress. These plugins provide user-friendly interfaces for managing webhooks and can handle many of the complexities for you.
Using a workflow automation plugin to set up a webhook in WordPress
Workflow automation plugins, such as ![]() AutomatorWP or
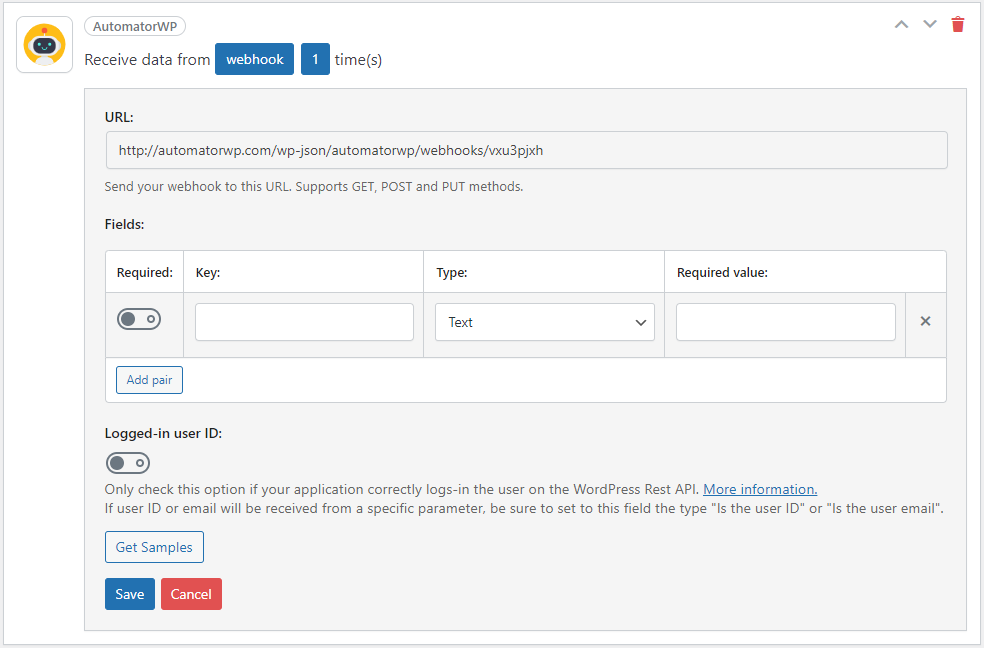
AutomatorWP or ![]() Uncanny Automator, simplify the process of setting up and managing webhooks in WordPress. These plugins provide user-friendly interfaces and come with pre-built triggers and actions, reducing the need for custom coding. Here’s a basic step-by-step guide on how you might set up a webhook with AutomatorWP.
Uncanny Automator, simplify the process of setting up and managing webhooks in WordPress. These plugins provide user-friendly interfaces and come with pre-built triggers and actions, reducing the need for custom coding. Here’s a basic step-by-step guide on how you might set up a webhook with AutomatorWP.
- Install and activate the AutomatorWP plugin: You can download it from the WordPress plugin repository and install it directly from your WordPress admin panel.
- Create a new automation: In your WordPress admin panel, go to
AutomatorWP > New Automation. - Add a webhook trigger: Click the
Add Triggerbutton and select theWebhook Receivedtrigger. This will open a configuration panel where you can specify the details of the webhook.- Webhook URL: This will be automatically generated by the plugin. You’ll need to provide this URL to your ESP when setting up the webhook.
- Request Method: Select
POST. - Data Format: Select
JSONorXML, depending on what your ESP sends.
- Set up actions: After the webhook trigger, you can add one or more actions that will be executed when the webhook is received. For example, you might add an action to create a new post, update a user profile, send an email, or anything else that you want to happen when the webhook is triggered.
- Save and activate the automation: Click the
Savebutton and ensure that the automation is active.
Now, whenever the ESP sends a webhook to the URL provided, AutomatorWP will trigger the automation and perform the actions you’ve set up.
Remember to test the webhook to make sure everything is working as expected. You can do this by sending a test webhook from your ESP’s dashboard, or by using a tool like Postman to send a test request to the webhook URL.
As always, be aware of security considerations when setting up webhooks. Always use HTTPS for your webhook URLs, and consider implementing additional security measures like secret tokens or IP whitelisting, if supported by your ESP.
Analyzing information from webhooks
Webhooks provide a wealth of data that can be leveraged to improve your email marketing strategies. Here are some examples of how you might analyze the data:
- Engagement metrics: Track open and click events to measure how engaged your recipients are with your emails. High open and click rates are a good sign that your content is resonating with your audience.
- Delivery performance: Monitor send, delivery, and bounce events to measure the success of your email delivery. A high bounce rate could indicate problems with your email list or the quality of your emails.
- Spam reports: Keep an eye on spam report events. A high number of spam reports is a serious issue that could harm your sender reputation.
- Unsubscribe rates: Track unsubscribe events to measure list churn. A high unsubscribe rate could indicate that your content is not meeting your recipients’ expectations.
Webhook security
Webhook security is a critical aspect that needs careful consideration. As webhooks involve your server receiving information from the ESP, it’s crucial to ensure that the data is coming from a trusted source and hasn’t been tampered with. Here are some security best practices:
- HTTPS: Always use HTTPS for your webhook URLs to ensure the data is encrypted during transit.
- Secret tokens: Some ESPs allow you to define a secret token that they’ll send as part of every webhook call. You can verify this token to confirm the data is coming from your ESP.
- IP whitelisting: If your ESP provides a list of IP addresses that it uses for webhooks, you can configure your server to only accept incoming requests from those IPs.
Conclusion
Webhooks are a powerful tool for WordPress site operators, providing real-time insights into email performance and user engagement. By understanding the different webhooks provided by ESPs, you can choose the best service for your needs and make the most of the data you receive. Remember, the right set of webhooks can empower your email marketing strategy, bringing you closer to your users and their needs.


