
WordPress core sends mail through PHPMailer, and PHPMailer exposes a hook (phpmailer_init) that fires immediately before any message is dispatched. Configuring SMTP without a plugin means using that hook to point PHPMailer at an external mail server, with credentials stored in wp-config.php instead of the database. The whole arrangement is a few constants and a six-line snippet.
This is the no-plugin alternative path. The recommended approach for most WordPress sites (picking an external service, installing a mailer plugin to connect it, publishing SPF/DKIM/DMARC) is in How to set up email on WordPress. Read on if wp-config.php is where the credentials should live.
When this is the right approach
The advantages are narrow but real:
- No additional plugin to maintain, update, or audit.
- SMTP credentials live in
wp-config.php, outside the database and away from the admin UI. - Fewer moving parts between WordPress and the mail server.
A dedicated mailer plugin adds features this approach does not: email logging, failover to a backup mail server, HTTP API transports (which bypass SMTP port restrictions entirely), and a configuration UI that does not require editing PHP. If any of those matter, use a plugin. The code-only approach is best on sites where the operator already manages wp-config.php and prefers credentials to live there.
Constraints to check before starting
Three operational realities in 2026 will sink a code-only SMTP setup faster than any syntax error.
Outbound port 25 is restricted across every mainstream IaaS and shared-hosting platform. AWS, Google Cloud, Azure, DigitalOcean, Linode, Vultr, and the major shared hosts restrict outbound traffic on port 25 by default. Submission ports 587 (STARTTLS) and 465 (implicit TLS) are usually open, though DigitalOcean is a notable exception (it blocks 25, 465, and 587 on Droplets). If the SMTP provider documents both 587 and 465, prefer 587.
Microsoft 365 SMTP AUTH is being retired. Microsoft began phasing out Basic Authentication for SMTP submission in 2022. The remaining default-on access for existing Exchange Online tenants is scheduled to be disabled by default at the end of December 2026, with the final removal date to be announced in the second half of 2027 (per Microsoft’s Exchange Team  updated deprecation timeline). New Microsoft 365 tenants created after December 2026 will not have SMTP AUTH available at all. Personal Outlook.com accounts created in 2026 (including those on Microsoft 365 Basic) have been
  observed to ship with SMTP AUTH disabled by default and no user-facing toggle to re-enable it. Sites that depend on Microsoft 365 for outbound SMTP should plan a migration to a dedicated transactional provider (see SMTP services for WordPress) or to OAuth-based sending via a mailer plugin.
Gmail and Outlook require app-specific credentials, not account passwords. Google removed Less Secure App (LSA) access was Google's name for the third-party authentication path that used a plain account password against Gmail's SMTP, IMAP, and POP endpoints. Google shut it down for consumer accounts on 30 May 2022 and for Workspace accounts on 1 May 2025; OAuth, App Passwords, or a different sending provider replace it. Read full reference → for consumer Gmail in May 2022 and for Workspace in May 2025 (after several deferrals from the originally announced September 2024 date). SMTP basic auth against Gmail now requires either an App Password (and that account must have 2-Step Verification turned on) or OAuth 2.0. The code-only path described below works with App Passwords; for the trade-offs, see Gmail OAuth vs. App Passwords.
The configuration
The work has two halves: a snippet that registers a phpmailer_init callback, and a block of constants in wp-config.php that the callback reads.
Step 1: Gather the provider’s SMTP settings
From the provider’s documentation, collect five values: hostname, submission port, encryption mode (STARTTLS or implicit TLS), username, and password (or App Password, or API-key-as-password depending on the provider).
Postmark, SendGrid, Mailgun, Brevo, Amazon SES SMTP, and SMTP2GO each document these values on a single page and assign per-credential SMTP usernames distinct from any account login. Microsoft publishes its own  SMTP submission settings for Microsoft 365 and Outlook.com, though see the Microsoft 365 deprecation note above before relying on it.
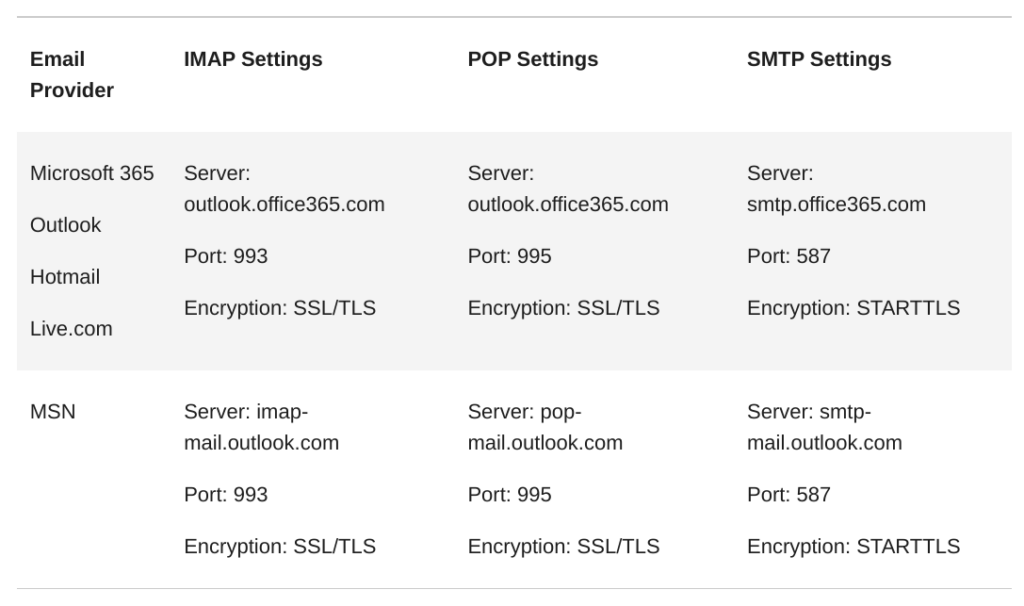
Microsoft Outlook SMTP settings
Step 2: Register the phpmailer_init callback
The phpmailer_init action fires inside wp_mail() immediately before any send. Its single argument is the live PHPMailer instance, passed by reference; any properties set on it apply to the message about to go out. Calling isSMTP() switches PHPMailer from the default PHP mail() transport to SMTP for that send.
Place this snippet wherever the site stores custom PHP: a mu-plugin, a child theme’s functions.php, or a snippet manager. The  Code Snippets plugin is a common choice for sites that prefer not to touch theme files. For a survey of the options, see Best ways to add custom code to WordPress.
add_action( 'phpmailer_init', 'np_send_smtp_email' );
function np_send_smtp_email( $phpmailer ) {
    $phpmailer->isSMTP();
    $phpmailer->Host       = SMTP_HOST;
    $phpmailer->Username   = SMTP_USER;
    $phpmailer->Password   = SMTP_PASSWORD;
    $phpmailer->From       = SMTP_FROM;
    $phpmailer->FromName   = SMTP_FROMNAME;
    $phpmailer->Port       = SMTP_PORT;
    $phpmailer->SMTPAuth   = SMTP_AUTH;
    $phpmailer->SMTPSecure = SMTP_SECURE;
}
The constant names are arbitrary. PHPMailer reads the property values, not the constant names. Using SMTP_* is convention, not requirement. The np_ prefix on the function name avoids collision with anything else on the site that hooks the same action.
Step 3: Define the constants in wp-config.php
Add the constants above the /* That's all, stop editing! */ line in wp-config.php:
// SMTP transport for wp_mail()
define( 'SMTP_HOST',     'smtp.example.com' );
define( 'SMTP_USER',     '[email protected]' );
define( 'SMTP_PASSWORD', 'the-account-or-app-password' );
define( 'SMTP_FROM',     '[email protected]' );
define( 'SMTP_FROMNAME', 'Website Name' );
define( 'SMTP_PORT',     587 );
define( 'SMTP_AUTH',     true );
define( 'SMTP_SECURE',   'tls' );
A worked example for a site sending through Microsoft 365 (subject to the deprecation noted above):
define( 'SMTP_HOST',     'smtp.office365.com' );
define( 'SMTP_USER',     '[email protected]' );
define( 'SMTP_PASSWORD', 'Ms66o3wd|YmQs>k' );
define( 'SMTP_FROM',     '[email protected]' );
define( 'SMTP_FROMNAME', 'Cool Digs Website' );
define( 'SMTP_PORT',     587 );
define( 'SMTP_AUTH',     true );
define( 'SMTP_SECURE',   'tls' );
Two values cause most failures here. SMTP_PORT takes the integer port: 587 for STARTTLS, 465 for implicit TLS, 25 if the provider documents it and the host allows it. SMTP_SECURE is the string PHPMailer expects: 'tls' for STARTTLS on 587, 'ssl' for implicit TLS on 465, empty string for none.
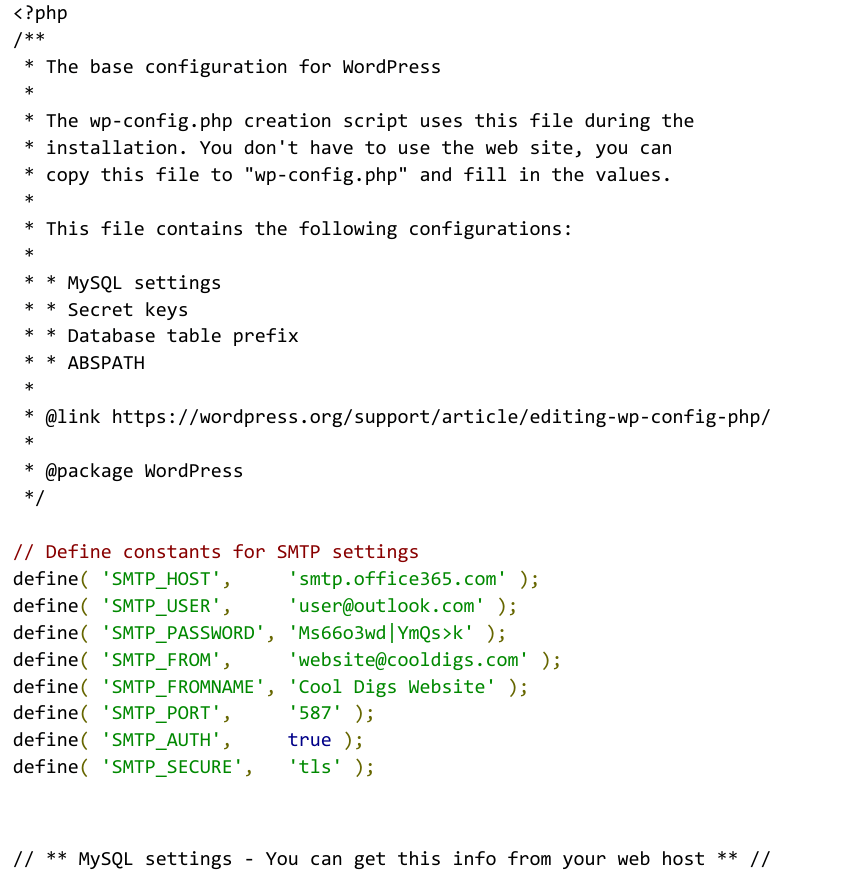
wp-config.php with SMTP settings
Step 4: Test by triggering a real send
The quickest end-to-end test is the WordPress “Lost your password?” flow, which calls wp_mail() through the standard core path:
- Log out, or open an incognito window.
- Navigate to
yourdomain.com/wp-login.php. - Click “Lost your password?”.
- Enter the username or email of a real account.
- Click “Get New Password”.
A password-reset message arriving at the user’s inbox confirms PHPMailer connected to the SMTP server, authenticated, and the server accepted the message for delivery. A failure here is the cue to capture the SMTP session; see the debugging section below.
Sending mail programmatically with wp_mail()
The same SMTP configuration applies to any code that calls wp_mail(), so once the snippet is in place, programmatic sends route through the configured server with no additional setup. The function signature is wp_mail( $to, $subject, $message, $headers = '', $attachments = array() ):
$to– recipient email address (string or array of addresses).$subject– subject line.$message– body (plain text unless theContent-Typeheader marks it as HTML).$headers– additional headers, as a string or array.$attachments– file paths to attach, as a string or array.
A representative send:
$to      = '[email protected]';
$subject = 'Email Subject';
$message = 'Hello, this is a test email from WordPress.';

$headers = array(
    'From: My Website <[email protected]>',
    'Reply-To: Reply Name <[email protected]>',
    'Content-Type: text/html; charset=UTF-8',
);

$attachments = array(
    WP_CONTENT_DIR . '/uploads/file1.pdf',
    WP_CONTENT_DIR . '/uploads/file2.jpg',
);

wp_mail( $to, $subject, $message, $headers, $attachments );
wp_mail() returns a boolean. true means PHPMailer accepted the message for sending and the SMTP server returned a positive response. It does not mean the message reached an inbox. Bounces, spam-folder routing, and silent provider drops are not captured in the return value; for visibility into what happened after the SMTP handoff, a mailer plugin with logging or the provider’s own logs are the only practical options.
Sending HTML mail
Setting the Content-Type header to text/html switches PHPMailer’s encoding for the body:
$to      = '[email protected]';
$subject = 'Email Subject';
$message = '
    <html>
    <head>
        <title>Email from WordPress</title>
    </head>
    <body>
        <h1>Hello</h1>
        <p>This is an HTML email from WordPress.</p>
    </body>
    </html>';

$headers = array(
    'From: My Website <[email protected]>',
    'Reply-To: Reply Name <[email protected]>',
    'Content-Type: text/html; charset=UTF-8',
);

wp_mail( $to, $subject, $message, $headers );
Including the outer <html> and <body> tags is worth doing: some email clients render fragments inconsistently.
Debugging the SMTP session
When the password-reset test fails or messages disappear silently, capturing the raw SMTP transaction is the fastest path to a diagnosis. The conversation between PHPMailer and the server records every command, every response code, and the exact point where things went wrong. For a guided read of one of these logs, see How to read an SMTP session log.
PHPMailer exposes a Debugoutput property that accepts a callback invoked for each line of the session. Setting it inside the same phpmailer_init callback (alongside SMTPDebug = 2 or higher) writes the session to disk:
add_action( 'phpmailer_init', 'np_log_smtp_session' );
function np_log_smtp_session( $phpmailer ) {
    $phpmailer->SMTPDebug = 2;
    $phpmailer->Debugoutput = function( $str, $level ) {
        $log_dir = WP_CONTENT_DIR . '/smtp_logs';
        if ( ! file_exists( $log_dir ) ) {
            mkdir( $log_dir, 0755, true );
        }
        $filename = $log_dir . '/smtp_log_' . date( 'Y-m-d_H-i-s' ) . '.log';
        file_put_contents( $filename, $str, FILE_APPEND );
    };
}
SMTPDebug levels: 0 silent, 1 client commands, 2 client and server (the useful default), 3 plus connection negotiation, 4 plus low-level data. Level 2 captures enough to diagnose the common failures (failed AUTH, rejected MAIL FROM, missing STARTTLS support) without flooding the log.
Each send writes to a timestamped file under wp-content/smtp_logs/. The directory is created automatically on first write. Remove the logging snippet once the diagnosis is in hand: leaving SMTP debug logging on a busy site fills disk quickly and writes credentials to disk-readable files.
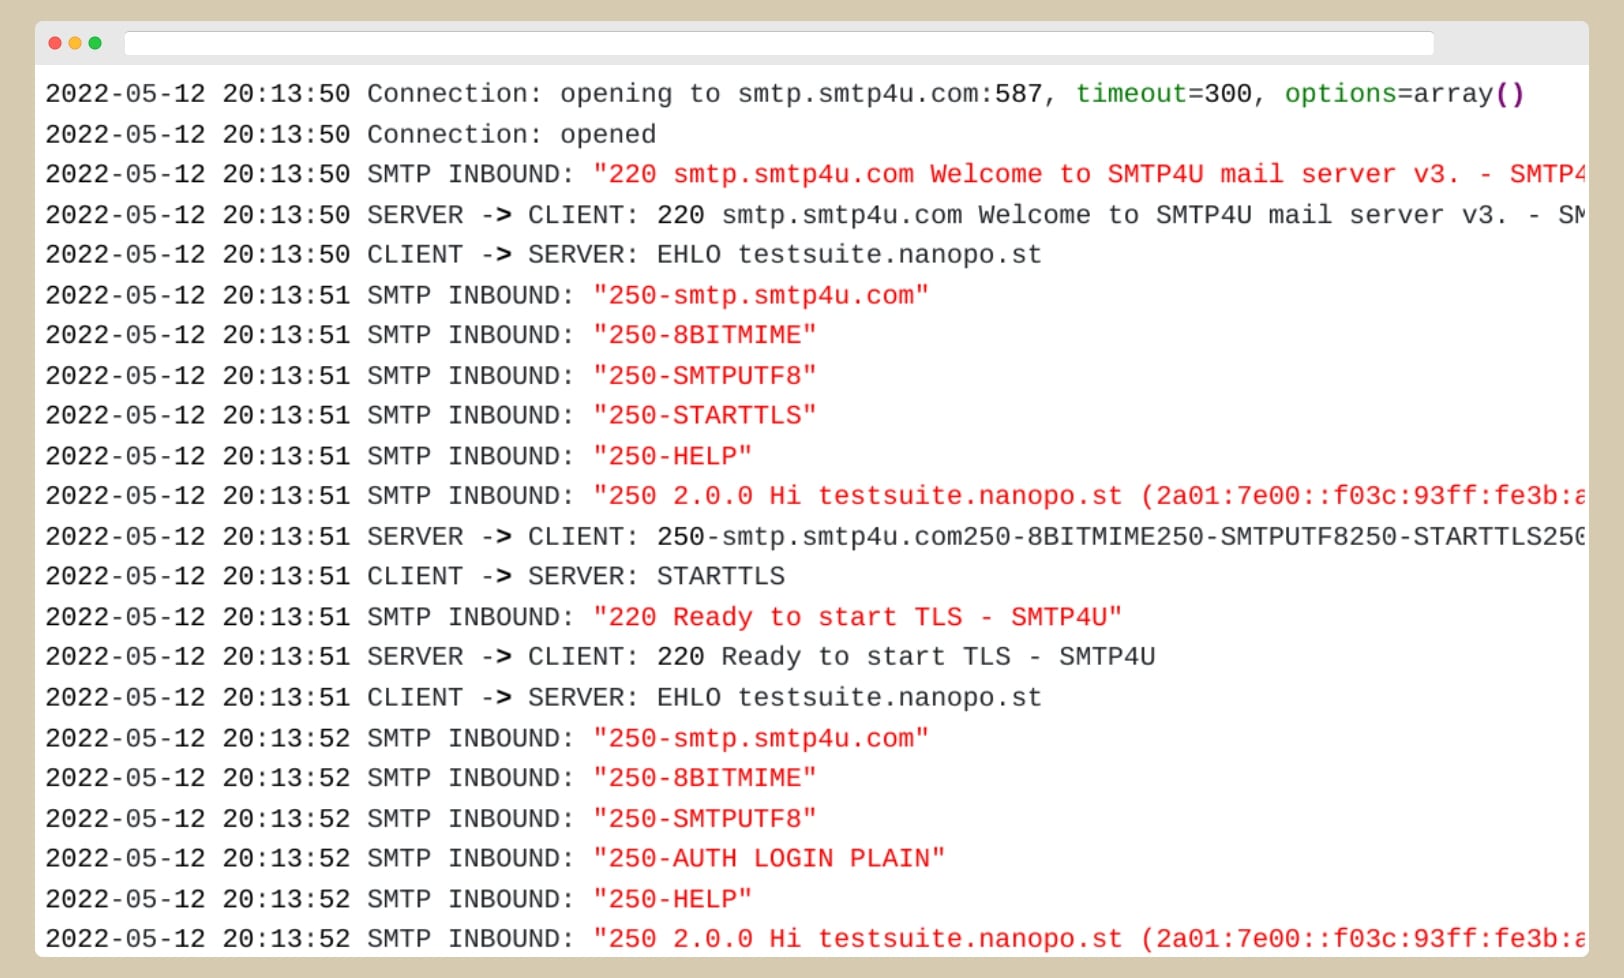
An SMTP session
The captured session shows the full SMTP handshake: EHLO, STARTTLS negotiation, AUTH, MAIL FROM, RCPT TO, DATA, and the server’s response codes at each step. The point where the response code shifts from 2xx (success) or 3xx (continue) to 4xx (transient failure) or 5xx (permanent rejection) is the line that explains the failure.
When SMTP setup is the wrong tool
The configuration above solves a specific problem: a WordPress site that needs to send transactional mail through an external server. If the actual problem is narrower (a contact form that needs to deliver submissions to an inbox, and nothing else), a third-party form handler avoids the SMTP layer entirely. See Create a WordPress contact form without plugins for that approach.
For a broader survey of how WordPress email fails and how to test each layer, Troubleshoot WordPress email walks through the diagnostic sequence from wp_mail() to the receiving server. This guide is the SMTP slice of WordPress without the plugin, nanoPost’s coverage of the patterns that work without the usual stack.