Contact Form 7 sends submissions to a single email address by default. Two built-in mechanisms handle multi-recipient scenarios without plugins or custom code: cc: and bcc: headers for sending the same message to several addresses, and pipe-separated dropdown values for routing different submissions to different inboxes.
- Wporg Slug
- contact-form-7
- Vendor
- Rock Lobster Inc.
- Vendor Url
- View ↗
- License Model
- free
- Active Installs
- 10000000
- Rating
- 80
- Num Ratings
- 2174
- Last Updated
- 2026-05-15 2:55am GMT
- Tested Up To
- 7.0.1
- Requires Wp
- 6.7
- Requires Php
- 7.4
- Capabilities Verified
- 2026-06-14
- Version Tested
- 6.1.6
- Tested On
- 2026-06-14
- Verdict
- The right default form plugin for a site that already has a mailer configured and needs nothing beyond routing a submission through it.
- Best For
- WordPress operators who want an independent, no-upsell form plugin and are comfortable adding Flamingo for submission storage.
The Mail tab
All email configuration lives in the Mail tab of each form’s settings:
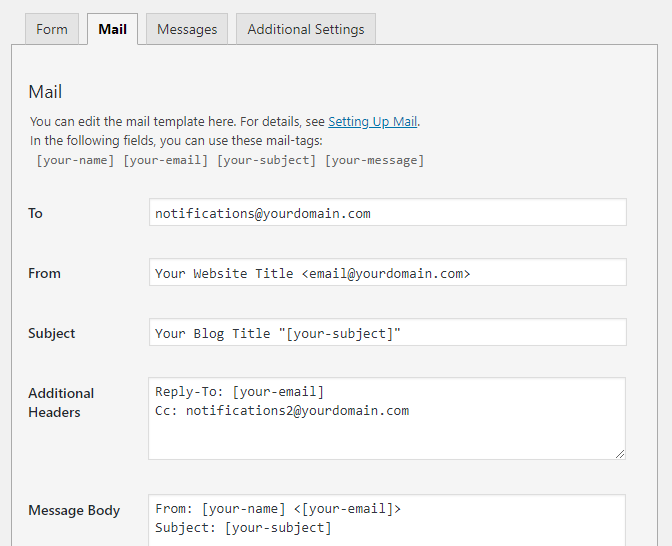
The fields that matter for multi-recipient delivery:
- To – primary recipient address
- Additional Headers – where cc: and bcc: lines go
- Mail (2) – an optional second email (autoresponder/confirmation to the submitter)
Mail tags like [your-name] and [your-message] are replaced with form field values in the subject, body, and recipient fields.
Send to multiple email addresses with cc and bcc
cc: and bcc: lines go on the Additional Headers field, one per line, each accepting a comma-separated list of addresses. The primary To address still gets the message; cc and bcc extend that list.
bcc: hide the extra recipients from each other
bcc: [email protected], [email protected]The bcc: (blind carbon copy) header adds recipients to the outgoing message without exposing their addresses in the copy any recipient sees. Every recipient sees only the primary To address in the visible headers; the bcc list is stripped from the copies delivered to everyone else. This is the right header for archive inboxes, internal audit addresses, or any case where recipients shouldn’t see one another.
cc: expose the extra recipients to everyone
cc: [email protected], [email protected]cc: (carbon copy) is the visible version: every recipient sees the full cc list in the email headers. Use it when the extra recipients are supposed to be visible to the others: a supervisor copied on a customer support inquiry, or a team address alongside the individual owner.
Combining cc, bcc, and the To field
Both headers can appear at the same time:
cc: [email protected]
bcc: [email protected]
The To field also accepts a comma-separated list directly ([email protected], [email protected]), but keeping the primary recipient in To and the additional ones in cc: / bcc: on Additional Headers is easier to audit and matches how mail clients render the message.
Route to different recipients by category
Use CF7’s pipe separator in a dropdown field to map visible labels to hidden email addresses:
[select* message-type "Sales|[email protected]" "Tech Support|[email protected]" "Billing|[email protected]"]The text before the pipe (Sales, Tech Support, Billing) is what the user sees in the dropdown. The text after the pipe is the value CF7 uses internally.
Set the To field in the Mail tab to the dropdown’s mail tag:
[message-type]CF7 replaces [message-type] with the email address associated with the selected option. The user selects “Tech Support” from the dropdown; the submission goes to [email protected].
This pattern works for any routing scenario: department routing, regional offices, or topic-specific inboxes. The pipe separator is also available in radio buttons ([radio]) and checkboxes ([checkbox]), not just dropdowns.
Combining routing with cc or bcc
The two approaches compose. A form can route to a department via the pipe-separator dropdown in the To field while also cc’ing a supervisor on every submission via Additional Headers:
To: [message-type]
cc: [email protected]
For more complex routing (conditionally adding cc recipients based on form values, or sending entirely different emails per category), CF7’s Mail (2) tab provides a second independent email configuration. Enable it in the Mail tab to send a confirmation to the submitter or a separate notification to a different recipient list.
Header injection: do not put free-form user input in recipient fields
If a [textarea] value (or any field a determined submitter can put a newline into) is interpolated into the To field or Additional Headers, the embedded newline splits the header line and the attacker gets to add their own headers. The form becomes an open relay.
CF7 trims leading and trailing whitespace from submitted values (wpcf7_strip_whitespaces in includes/formatting.php) and strips null bytes, but it does not strip newlines from inside the value before substituting it into the mail template.
The safe pattern is to only interpolate mail tags whose values are constrained at the form level. The pipe-separated dropdown from the routing section above is safe: the submitter can only pick one of the values you defined. A [text], [email], or [textarea] field is not safe in headers: the value is whatever the submitter sent.
If a form needs to route to one of several internal addresses based on user input, define the addresses in a dropdown (or radio/checkbox) and reference the resulting mail tag. Never build a recipient string by concatenating a free-form field value.
CF7 sets a Reply-To: [your-email] header by default, using the submitter’s email field directly. That works because the field is validated as an email and a valid address cannot contain a newline. The same logic does not apply to [text] or [textarea].
For everything else the plugin does (architecture, add-on ecosystem, alternatives worth evaluating), see the Contact Form 7 review.