How to set up DNS for WordPress email: SPF, DKIM, DMARC

When sending emails from your WordPress site, you might want them to appear as coming from your domain, such as [email protected]. To achieve this, you’ll need to set up several DNS records: SPF, DKIM, and optionally, DMARC.

These settings are also essential to avoid having your emails marked as spam, improving deliverability, and enhancing your domain’s reputation.

You normally set up your domain’s DNS records through your domain registrar or web hosting provider’s control panel, that is, where you bought your domain name.

The Domain Name System (DNS) is the telephone book of the internet. Its entries are instructions that link domain names, such as google.com to IP addresses such as 142.250.179.206, which are the unique server identifiers of the internet.

DNS can provide a wide range of additional types of information beyond this. Cloudflare, a DNS service provider, lists 25 such types. For setting up DNS records for sending emails from WordPress, the types we need to focus on are DKIM, MX, SPF, and DMARC.

An SPF (Sender Policy Framework) record is DNS record of type TXT record that specifies the servers authorized to send emails from a particular domain. DNS TXT records allow domain administrators to input arbitrary text into the Domain Name System (DNS). Initially created to include essential notices about the domain, TXT records have evolved to serve other purposes, including email authentication.

The need for SPF records arises from the fact that the Simple Mail Transfer Protocol (SMTP), the standard protocol for email, does not inherently authenticate the “from” address in an email. Without SPF or other authentication mechanisms in place, attackers can easily impersonate senders and deceive recipients into taking actions or divulging information they otherwise wouldn’t.

An SPF record functions like a guest list managed by a door attendant. If someone isn’t on the list, the attendant won’t let them in. Similarly, if a sender’s IP address or domain isn’t on the SPF record, the receiving server (acting as the door attendant) may mark those emails as spam or not deliver them at all.

SPF records are just one of many DNS-based methods that help email servers determine whether an email originates from a trusted source. Domain-based Message Authentication Reporting and Conformance (DMARC) and DomainKeys Identified Mail (DKIM) are two other mechanisms used for email authentication.

It’s important to note that SPF records once had a dedicated DNS record type. However, this dedicated record type has been deprecated, and now only TXT records are used for SPF purposes.

Benefits of using SPF for WordPress email

Implementing SPF for your WordPress emails increases deliverability, reduces the chances of your emails being marked as spam, and improves your domain’s reputation.

DKIM (DomainKeys Identified Mail) is an email authentication technique that helps safeguard against spammers and malicious individuals who might attempt to impersonate a legitimate domain. Attackers may try to mimic a domain when sending emails for phishing attacks or other deceptive purposes.

For instance, let’s say an attacker wants to deceive Alice, an employee of example.com, into sharing sensitive company information. The attacker could send an email appearing to come from [email protected], tricking Alice into thinking the sender is a fellow employee at example.com.

By implementing DKIM, along with Sender Policy Framework (SPF) and Domain-based Message Authentication Reporting and Conformance (DMARC), domains can significantly hinder such impersonation attempts. Emails that fail to pass DKIM and SPF checks are often labeled as “spam” or not delivered at all by email servers. If example.com has properly set up DKIM, SPF, and DMARC, Alice will likely never receive the attacker’s malicious email, as it would be directed to her spam folder or rejected entirely by the email server.

Benefits of using DKIM for WordPress email

Using DKIM for your WordPress emails increases email deliverability, improves your domain’s reputation, and offers an added layer of security to prevent email tampering.

DMARC (Domain-based Message Authentication Reporting and Conformance) is an email authentication technique that instructs receiving email servers on how to handle messages after verifying the domain’s SPF and DKIM records, which are also email authentication methods.

Email authentication methods like DMARC, DKIM, and SPF are essential to prevent email spoofing. Sometimes, malicious actors or spammers attempt to send emails using a domain they are not authorized to use, similar to providing a false return address on a letter. They do this to deceive users, as in phishing attacks, or for other malicious purposes.

DMARC, DKIM, and SPF work together to perform background checks on email senders, confirming their authenticity.

For instance, consider a spammer who sends an email from [email protected] without proper authorization to use the example.com domain. They achieve this by altering the “From” header in the email. Receiving email servers can use DMARC, SPF, and DKIM to detect that the email is unauthorized, and subsequently, mark it as spam or reject its delivery.

Benefits of using DMARC for WordPress email

Implementing DMARC for your WordPress emails can further improve email deliverability, enhance domain reputation, and provide insight into email authentication performance.

Setting up SPF, DKIM, and DMARC records

In essence, setting up DNS records involves copying and pasting a few code snippets from your email service provider into your DNS settings. We will provide general instructions in this article, along with links to specific instructions for various hosting providers below.

Have a WordPress email problem right now? Ask us about it.

We’ll attempt to publish a solution ASAP for free. Challenge us!

So we can notify you when we publish a solution

Step 1: Collect the information from your email service provider

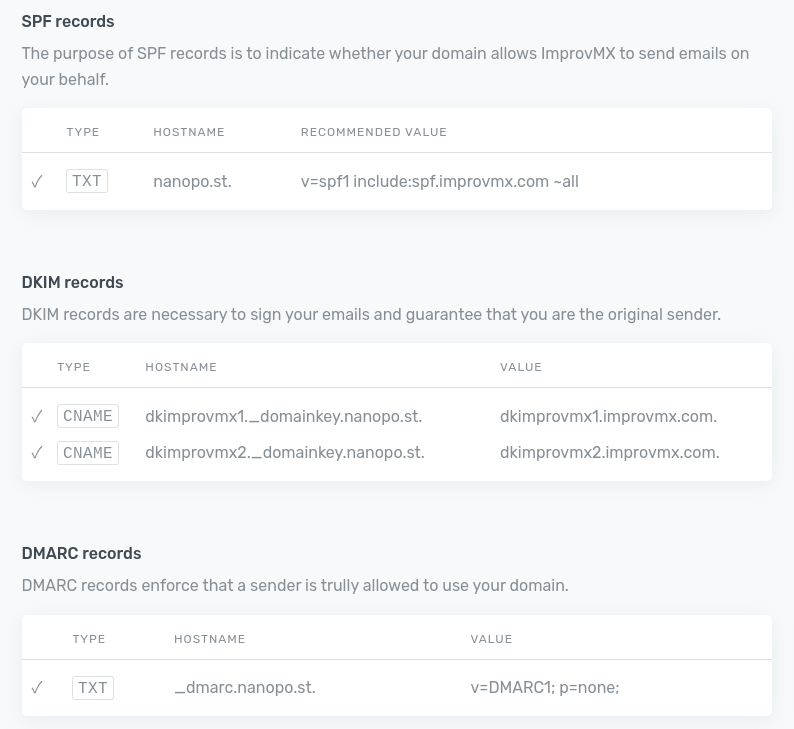
Your email service provider needs to tell you what DNS records you need to set up to work with their servers. In the example below, email service provider ImprovMX requires us to set up four entries:

Email service DNS entries

Note that each entry has three parts:

  1. The DNS entry type (TXT, CNAME).
  2. The subdomain of your domain for which this record needs to be entered (the part to the left of nanopo.st, e.g. dkimprovmx1._domainkey or _dmarc.nanopo.st). Where there is no subdomain, you usually enter @.
  3. The value of the entry (v=spf1 include:spf.improvmx.com ~all or v=DMARC1; p=none;).

Not all email service providers will require a DMARC record.

Step 2: Enter these records into your DNS settings

On Cloudflare’s DNS management screen, this might look something like this:
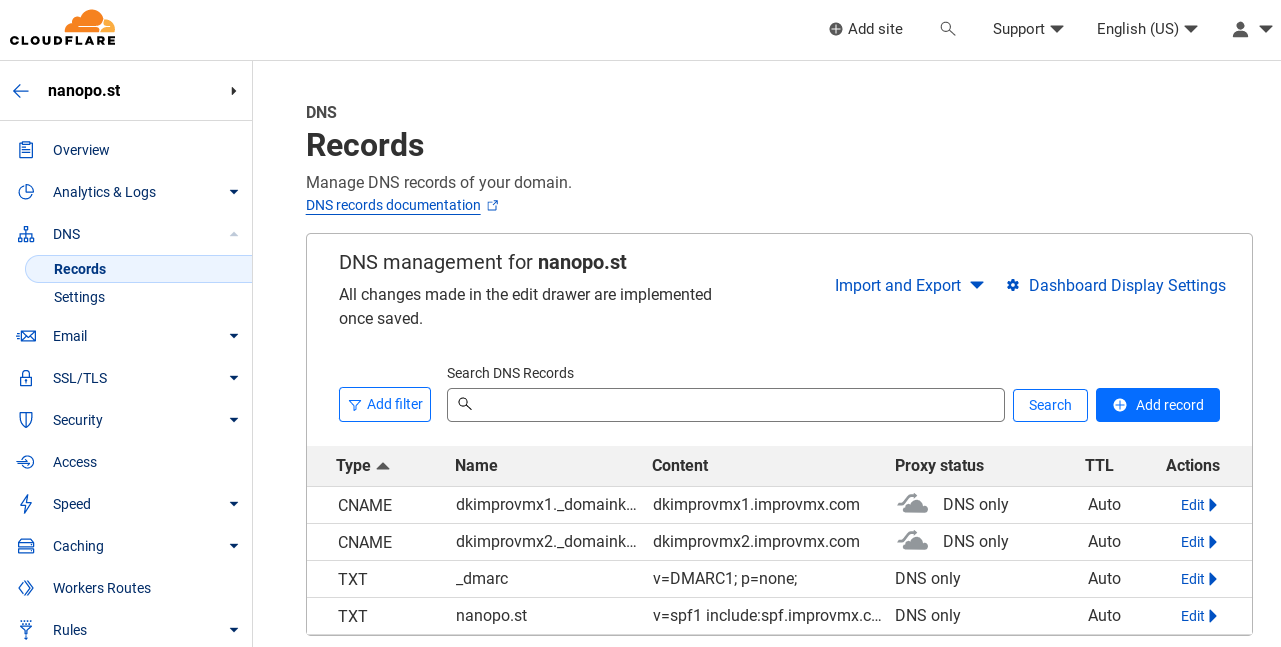
Cloudflare DNS records

Step 3: Click verify on your email service provider’s screen

Next to where your email service provider provides the details you collected in step 1 above, they will display a button labeled something similar to “Check” or “Validate“, like this:

Email DNS verify

Clicking that will cause your DNS records to be checked. If you entered them correctly, a confirmation will appear.

DNS setup instructions for select email service and hosting providers

We’ve gathered a collection of links to DNS setup instructions for some popular email service providers. These resources will guide you through the process of configuring SPF, DKIM, and DMARC records for your domain to ensure better email deliverability and security.

Hosting providersEmail service providers

    Troubleshooting

    Occasionally things go wrong, in which case you’ll need some deeper inspection tools. We’ll link them here, but won’t go into details, as this is intended as an introductory tutorial:

    Tools to test SPF, DKIM, and DMARC records

    Summary

    Setting up SPF, DKIM, and DMARC DNS records for your WordPress emails is crucial for improving deliverability, reducing the chances of your emails being marked as spam, and enhancing your domain’s reputation. These email authentication methods work together to ensure the legitimacy of the sender and protect against email spoofing and impersonation attempts. You can configure these DNS records through your domain registrar or web hosting provider’s control panel. By implementing SPF, DKIM, and DMARC for your WordPress emails, you’ll enjoy increased security and better overall email performance.

    References and further reading

    Leave a Reply

    Your email address will not be published. Required fields are marked *